03 Apr 1. Getting Actuals ExForm
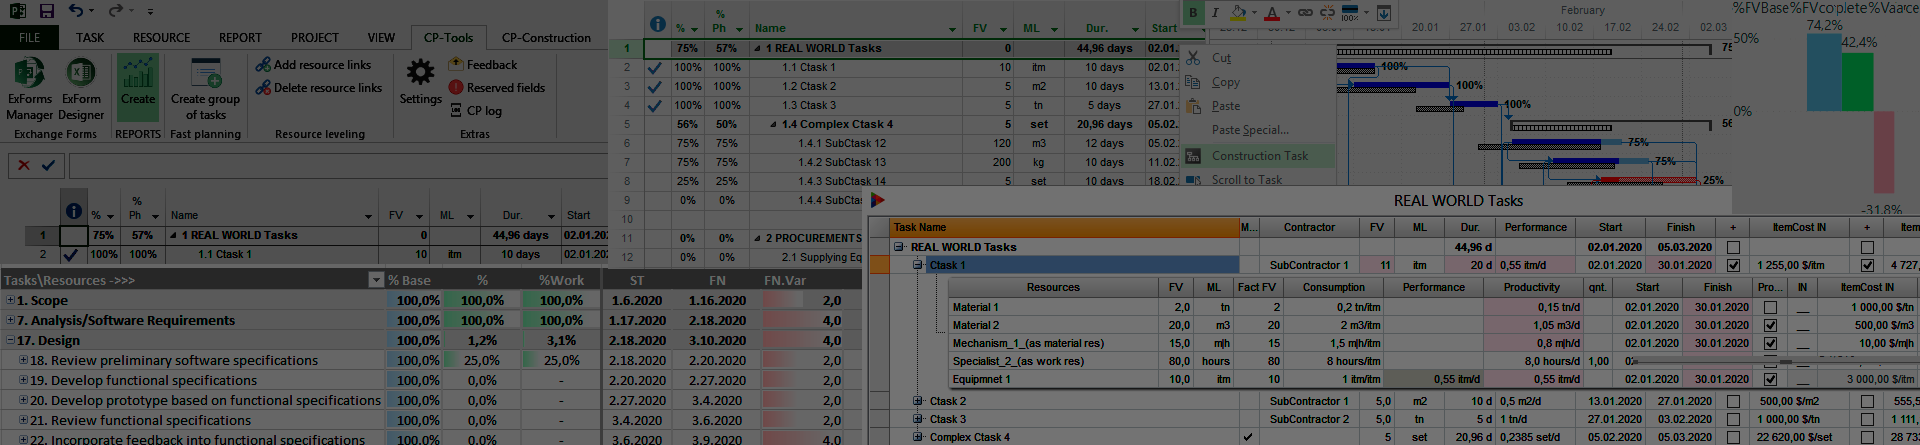
Getting Actual ExForms allow you to send MS Project tasks to resources and automatically collect what is done. ExForms are easy to use and provide special features not existing in MS Project Server and Project Online and functionality to handle C-Task actuals.

Two scenarios below are frequently used and you may configure something personal:
- Get actuals from resources assigned to task. That is like MS Project Server ‘on premises” and Project Online does.
- Get actuals from task Supervisor specified in text field as shown on slide above.
ExForm’s workflow assumes the following steps:
- In ExForms Designer
 – Publish Excel time-sheets according to ExForm settings to configurable public folder (by default to ‘User’ folder). Time-sheets are placed to subfolders created for each task resource or Supervisor assigned.
 - In ExForms Manager
 – Checking time-sheets state and approves correct ones. After approving actual data comes into project reflecting current progress.
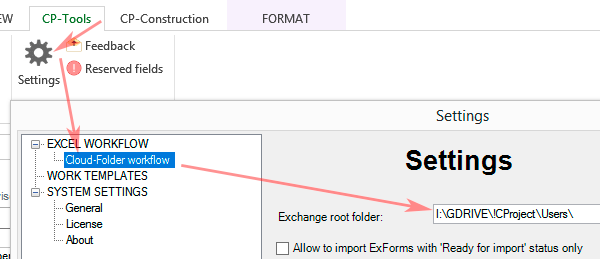
NOTE: Default ‘User’ folder can be changed in CP settings (CP-Tools -> Settings – > Cloud Folder workflow) on right slide. For example setting path to Google Drive, OneDrive, SharePoint or other sharing folder and giving project team access to supervisor’s and\or resource’s subfolders allows you to organize distributed workflow worldwide.
ExForm settings
After installing Construction Project there are forms available in ExFrom Designer by default. It easy to modify them according to your needs and use. Open ExForm Designer to edit Form by clicking on on CP-Tools ribbon tab.
- In ExForm Designer select ExForm you would like to edit and click Edit (it is recommended to make ExForm’s copy by clicking Copy and proceed with copy)
- In ExForm Editor there are many tabs and settings to play with but the most important are:
- ‘Workflow‘ tab – defines Resource’ or Supervisor’ timesheet creating mode
- ‘Timescaled data‘ tab – contains settings of timesheet’ periods and actuals data type to collect
- ‘Columns and Formulas‘ tab – MS Project task field selector to add required fields in timesheet
- Set required parameters as described below and click OK
- Click Publish in ExForm selector window.
Check timesheets state in ExForms Manager and approve those which is OK.
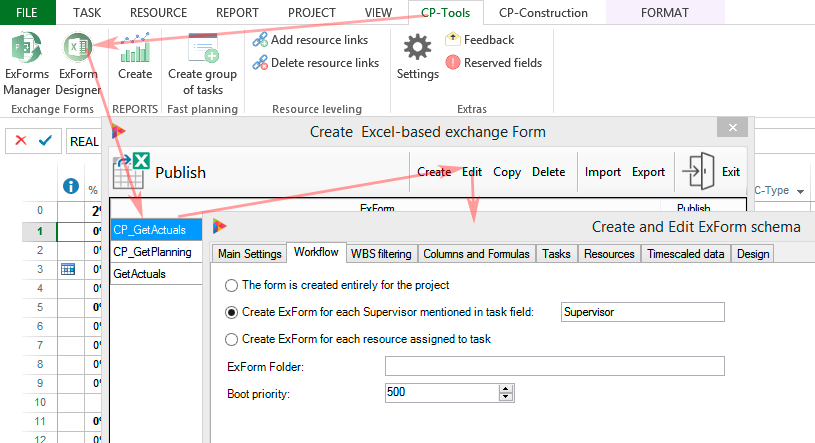
Workflow tab
Workflow tab opened on slide above. There are 3 modes to generate timesheets.
The form created entirely for the project
Only one timesheet is generated. Timesheet contains all project tasks (if no filters applied) with resources assigned. it is possible to enter actuals for each resource assignment.
Create ExForm for each Supervisor
Used in C-type projects but applicable for any project if you would like getting actuals from task Supervisor’s perspective. Lets think about Supervisor as a responsible person who is approving task result and really knows how much resources have been spent, To make it working you have to:
- Set Text field to keep Supervisor’ name (in right text box). It can be Alias of field like ‘Supervisor’ is the name of OutlineCode6 field on slide above. OutlineCodes or Text fields with LookUp table are easy to use due to dropdown feature,
- In project schedule enter Supervisor in Text field above.
- Publish ExForm. For each Supervisor the subfolder is being created (under ‘User’ folder by default) and timesheets are placed.
Create ExForm for each resource
Typical mode when each work resource assigned to task gets own timesheet. Work as previous but folders are created for each task resource. It is possible to filter resource by using filter in ‘Resources’ tab or selecting Group in ‘Timescaled Data’ tab. Please note, mode processes Work-type (in term of MS Project) resources only.
ExForm Folder
Additional folder to put timesheets in. If specified full path looks like ‘Root exchange folder’\’ExFrom folder’\….
Boot priority
If many ExForms are being processed the processing order matters. Specify boot priority get processing order required
Timescaled Data tab
Displays time line in timesheet allowing to enter value in specified date interval. If ‘Do not show timescaled data‘ checked no timeline shown in Excel timesheet. Most valuable tab settings are:
Time period settings
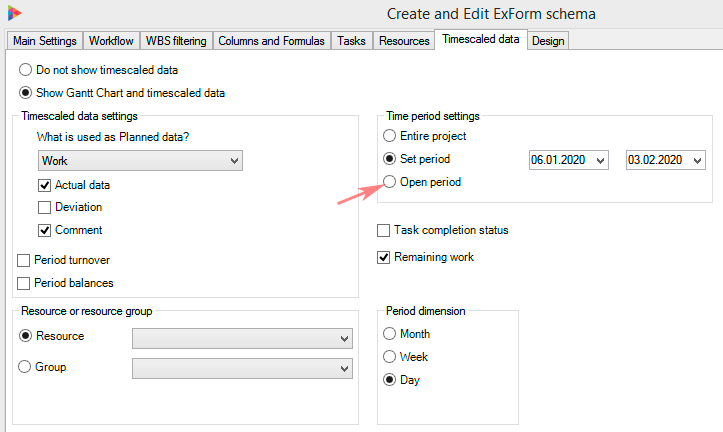
Defines time interval for which timesheet is generated.
- ‘Entire project‘ generates timeline from project start to project finish.
- ‘Set period‘ generates timeline according to dates specified.
- ‘Open period‘ (recommended) – only for Opened Periods timesheets will be generated. Open Period configured in ExForm Designer below in article. Provide possibility to enter actuals for specific time range and prohibit correction of actuals in the past.
NOTE; Be careful when selecting ‘Entire project’. Long timeline is not comfortable to work with and only 200 columns can be generated in timescaled part due to length restriction of formulas used.
Period dimension
Specify minimal reporting interval to enter actual. For example, If selected ‘Day’ the entered actual data after approving spread in MS Project schedule from day start time to day finish, if ‘Week’ specified the actuals will be distributed from week start to week end date.
Resource or resource group
Allows to limit number of timesheets created to just one resource or resource set defined by Group column in Resource Sheet.
Timescaled data settings
Define the target parameter to be displayed as planned one in timescale part.
- Work (mostly used, default)
- Baseline work
- Cost
Allows to show additional financial characteristics for some custom solutions.
Columns and Formulas tab
Add MS Project fields to timesheet left part. Using is the same as for Reports.
‘Tasks’ and ‘Resources’ tabs
Allows you to filter project tasks and resources uploaded to ExForm timesheet by using MS Project standard filters .
Design tab
Defines preferable colors for timesheet rows and optionally template to use.
Use template
Defines template which is mainly used for implementing corporate style. To assign template:
- Publish ExForm timesheet
- Open timesheet and do design required
- (Optional) Delete task rows from template to shorten size and publish time
- Save edited timesheet to ‘ExForms Templates’ folder
- Open ExForm in Manager, check ‘Use template’ and select saved timesheet.
No Comments